Showing posts with label Mexican Food. Show all posts

Sunday, December 29, 2024

Pollo Guisado or Latin Chicken Stew


 This recipe from Skinny Taste has become almost a weekly staple in our home. It is the most tender, moist chicken, so full of flavor! I pair it with any kind of rice or over potatoes with veggies. Super easy but looks like it was such a difficult meal to make!

Ingredients

  • 4 skinless chicken drumsticks (on the bone, 14 oz total)
  • 4 skinless chicken thighs (on the bone, trimmed, 20 ounces)
  • 1/2 teaspoon adobo seasoning salt
  • 1 teaspoon olive oil
  • 4 medium scallions (chopped)
  • 3 garlic cloves (minced)
  • 1/4 cup chopped cilantro (plus 2 tbsp for garnish)
  • 8 oz can tomato sauce
  • 1 packet sazon seasoning (optional)
  • 1/4 cup pitted green olives (plus 2 tablespoons brine)
  • 1 tablespoon Chicken Better Than Bouillon (or 1 cube)
  • 1/2 teaspoon cumin
  • 2 bay leaves

Instructions

  • Season chicken with adobo seasoning salt.
  • In a large deep skillet,  pot or Dutch oven, over medium heat saute the scallions in olive oil until soft, 2 to 3 minutes.
  • Add the garlic and 1/4 cup cilantro cook until soft, 1 to 2 minutes until fragrant.
  • Nestle the chicken in the pot and let brown 5 minutes, turning halfway.
  • Add tomato sauce, Sazon if using, 1 cup water, olive, olive brine, Bouillon, cumin and stir. Add the bay leaves and bring to a boil.
  • Cover and cook 50 minutes over medium-low heat, until the chicken is tender.
  • Uncover the pot, increase the heat to high and cook to thicken the sauce, about 5 to 10 minutes.
  • Remove the bay leaves, adjust salt if needed and add the remaining 2 tablespoons cilantro.

To make this in the Instant Pot

  • Cook on high pressure 20 minutes.
  • Natural release, discard bay leaves and top with remaining cilantro.

Thursday, October 12, 2023

Creamy White Chicken Enchiladas


 The Lazy Dish has done it again! These are delicious and super easy for a weeknight!


Ingredients

  • 8 flour tortillas (soft taco size)
  • 3 cups shredded chicken (I use Rotisserie)
  • 2 cups shredded monterey jack cheese (or pepper jack)
  • 4 ounces softened cream cheese
  • 2 tsp garlic powder
  • 3 tbsp butter
  • 3 tbsp flour
  • 1 tbsp taco seasoning (NOT the whole packet)
  • 1 (14.5oz) can of chicken broth (2 cups)
  • 3/4 cup sour cream
  • 1 (4oz) can of diced green chiles

Instructions

  1. Preheat oven to 350 degrees and grease a 9x13 baking dish.

  2. In a medium size bowl, mix the chicken with the cream cheese, garlic powder and HALF of the shredded cheese (about 1 cup). 

  3. Evenly stuff the mixture into your flour tortillas and place them into your prepared pan. 

  4. In a sauce pan over medium heat, melt the butter and then stir in the flour and taco seasoning. Add the chicken broth and whisk until smooth; allow the mixture to heat up for a few minutes until warm. Add 1/2 a cup of the shredded cheese and whisk until well incorporated. 

  5. Stir in the sour cream and can of chiles; whisk for just a minute or until the sour cream is completely dissolved, but do not allow it to boil.

  6. Pour the sauce over the enchiladas and top with remaining cheese. 

  7. Bake for 22-25 minutes and then switch the broiler on for a few minutes to brown the cheese. 

  8. The adults in the family like to serve these with hot sauce! Refried beans and spanish rice are also delicious on the side.

Wednesday, October 11, 2023

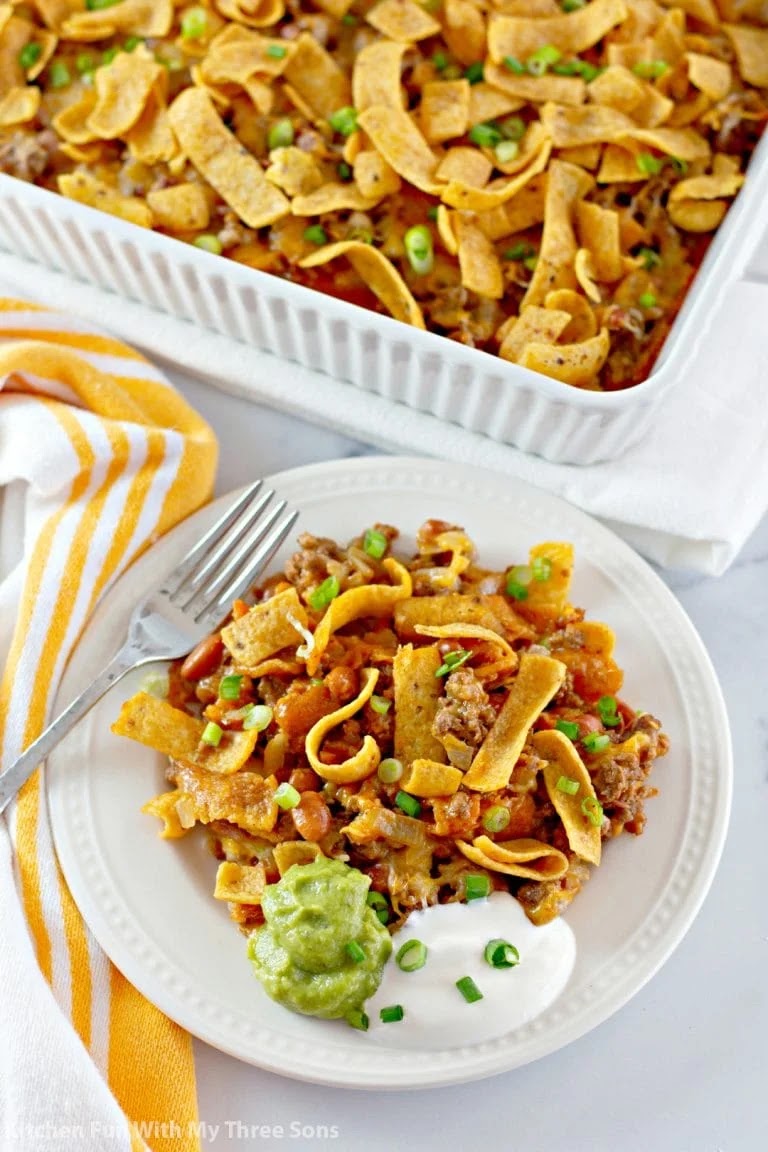
Easy Frito Pie


This is a super easy weeknight dinner that everyone loves. I double it so we have plenty! Recipe from Kitchen Fun with my Three Sons. 

Ingredients

  • 1 pound lean ground beef
  • 1 small onion peeled and diced
  • 1 package taco seasoning mix
  • 2/3 cup water
  • 1 can enchilada sauce
  • 1 can (15 ounce) pinto beans drained and rinsed
  • 1 bag (9.25 ounce) Fritos corn chips divided
  • 2 cups shredded Mexican blend cheese divided
  • 1 green onion chopped
  • sour cream for garnish
  • prepared guacamole for garnish

Instructions

  • Preheat the oven to 350ºF. Prepare a 9x13-inch glass baking dish by spraying it with non-stick cooking spray.
  • Crumble the ground beef into a large skillet. Add the onions and cook over medium heat, stirring often, until the beef is fully browned. Drain off the excess fat. Stir in the seasoning mix and water; bring to a simmer and cook for 3-4 minutes, stirring often.
  • Add the enchilada sauce and beans; stir well.
  • Pour 4 cups of the Fritos into the bottom of the prepared baking dish and sprinkle with 1 cup of the cheese. Evenly spread the meat mixture over the chips. Top with the remaining cheese.
  • Bake the casserole at 350ºF for 18-20 minutes until hot and bubbly. Sprinkle the top of the casserole with the remaining Fritos. 
  • Cool slightly before serving. Serve with chopped green onions, sour cream, and guacamole.


Wednesday, February 1, 2023

Creamy White Chicken Enchiladas


 I usually don't love chicken enchiladas, but I could eat these all day! Soo good...thanks to Midget Momma for this winner winner chicken dinner!

Ingredients

  • 2 cups boneless skinless chicken breasts
  • 2.5 cups shredded Monterey Jack cheese Or Pepper Jack cheese
  • 5 ounces cream cheese
  • 2 teaspoon garlic powder
  • 3 tablespoons butter
  • 3 tablespoons flour
  • 1 tablespoons taco seasoning
  • 2 cups chicken broth
  • 1 cup sour cream
  • 4 ounces canned diced green chilies
  • 10 soft flour tortillas

Instructions

  • Cook chicken by preferred method, boil, bake or using a rotisserie chicken.
  • Once chicken is cooked, Preheat oven to 350 degrees. Grease a 9x13 pan.
  • Add the cooked chicken to a bowl and shred with fork if it needs to shred. Add 3/4 cup shredded Monterey Jack cheese Or Pepper Jack cheese, garlic powder and cream cheese to the bowl and mix well so everything is combined.
  • In a sauce pan, melt butter, stir in flour and taco seasoning and cook 1 minute. Add 2 cups of chicken broth and whisk until smooth. Add 1/2 cup of shredded cheese and heat over medium heat until thick and bubbly.
  • Stir in sour cream and chilies. DO NOT bring to a boil. Remove the pot from the heat.
  • In each tortilla shell add in some chicken and cheese mixture roll up and place in the baking dish.
  • Pour the sauce over enchiladas and top with remaining cheese.
  • Bake 22 min and then under high broil for 3 min to brown the cheese.

Wednesday, November 10, 2021

Mexican-Style Acorn Squash


Recipe and photo from Sweet & Spice Blog. What a great meal this time of year! I love this healthy alternative to pasta. It's full of good stuff and lots of flavor!

Ingredients

  • 1 Acorn Squash
  • 4 tbsp Olive Oil
  • 1 lb Ground Beef
  • 1 tsp Paprika
  • 1/2 tsp Cumin
  • 1/4 tsp Cayenne Pepper (or more to taste!)
  • 1/4 tsp Salt
  • 2 tbsp fresh Cilantro finely minced
  • 1 small Yellow or Spanish Onion
  • 1 clove Garlic minced
  • 1 can Black Beans
  • 1 can Whole Kernel Corn
  • 1 cup Cherry Tomatoes quartered
  • 1/2 cup Cheddar Cheese grated
  • 1 Avocado sliced

Instructions

  1. Preheat your oven to 400°F.

  2. Cut your acorn squash in half (either length-wise or width-wise). Scoop out the seeds. Coat with olive oil, sprinkle with salt and pepper. Place in a linked baking dish and roast for 30 minutes until fork tender.

  3. While the acorn squash cooks, mince your onion and place into a sauté pan with olive oil, cumin, cayenne, and salt and pepper to taste.

  4. Sauté the onion until softened. Add in ground beef and cook until done. Add in the paprika and cilantro. Cook for 5 more minutes.

  5. Add in the beans, corn, tomatoes, and 1/4 cup cheese. Stir to mix.

  6. Remove the acorn squash from the oven when tender. Fill the whole in each squash with your beef and veggie mixture. Top with the remaining cheddar cheese.

  7. Place stuffed acorn squash back into the oven for 10 minutes until the cheese is melted and sizzling.

  8. Serve immediately with sliced avocado and remaining minced cilantro on top.

Wednesday, January 1, 2020

Slow Cooker Queso Chicken Tacos


This was one of my favorite chicken dishes I've had maybe ever! I loved it! And what's not to love about an easy crockpot recipe on a weeknight?! Picture and recipe from Sweet Little Blue Bird.

Ingredients

2 pounds boneless skinless chicken breasts
1 packet (1 ounce) of your favorite taco seasoning or use homemade
10 ounce can of Rotel with lime juice and cilantro (you can use Original Rotel too, or use homemade Rotel – Tomatoes and Green Chilies)
4 ounce can mild diced green chiles
1/2 cup chicken broth
3/4 cup salsa con queso – use your favorite brand or use homemade
taco shells, hard or soft
favorite toppings – lettuce, tomato, cheddar cheese, onions, jalapenos, sour cream, guacamole, fresh lime, cilantro, hot sauce, queso


Directions

Lightly spray slow-cooker with non-stick cooking spray.

Place chicken in single layer and sprinkle chicken evenly with taco seasoning. In a medium size bowl add Rotel, green chiles and chicken broth and mix well. Pour evenly over chicken.

Cook on low for *6 to 8 hours, or on high for *4 to 6 hours. Cooking times may vary depending on your slow cooker, adjust accordingly.

When ready, drain excess liquids leaving just a smidgen behind (I use a soup ladle), then shred chicken using two forks. Last, spoon queso on top and gently mix with chicken, coating chicken evenly. Cover and cook on low for 20 minutes or until heated through. Serve with tortillas (hard or soft shell) and your favorite taco toppings. Enjoy!

Wednesday, December 27, 2017

Mexican Lasagna


Recipe and picture from Simply Recipes. This was a meal I made for a big crowd and it served a lot of people. I adapted/simplified some of this recipe, but you can find the original on link. It's so good-worth a try! And your house will smell amazing. We served this with rice and salad!

Yield: Serves 8-10

Ingredients

Olive oil
1 1/4 lbs ground beef or ground turkey
1 teaspoon salt
1 tablespoon chili powder
1 tablespoon ground cumin
1 tablespoon ground coriander seeds
1/4 teaspoon cayenne
 1 medium onion, chopped, about 1 cup
1 red bell pepper, stem and seeds removed, chopped, about 1 cup
3 garlic cloves, peeled and minced
2 14-oz cans refried beans
 Extras
Sour cream
Avocado
Cilantro
Iceberg lettuce

Method

1 Brown the ground beef: Heat 2 Tbsp olive oil in a large sauté pan or cast iron frying pan on medium high heat. Add the ground meat, breaking it up as you add it.
Sprinkle with salt. Sprinkle on the chile powder, cayenne, cumin, and coriander. Increase the heat to high. Add another 2 Tbsp of olive oil.

Do not stir the meat unnecessarily. Allow the meat to brown on one side, and then stir it so the other side can be browned.
As soon as the meat is browned, remove the pan from the burner. The meat will continue to cook in the heat of the pan.
Once you are sure that the meat is cooked through, use a slotted spoon to remove the meat from the pan to a bowl. Set aside.
2 Sauté onions, bell peppers, garlic, add tomatoes, chiles, oregano: Once the meat is done cooking, and has been removed from the pan in step 1, add another Tbsp of olive oil to the pan and heat to medium. Add the onions and chopped bell peppers, cook until onions have softened, about 5 minutes. Add the garlic, cook for an additional 1 minute. Add the diced tomatoes, green chiles and oregano. Bring to a simmer. Simmer gently for 15-20 minutes. Add in meat and refried beans and stir gently until combined.
3 Preheat oven: Preheat oven to 350°F and lightly oil a 13x9x3-inch glass or ceramic baking dish.
4 In a casserole dish, layer the tortillas with beans, meat, cheese, and sauce mixture: In baking dish arrange 2 tortillas in one layer, overlapping slightly (tortillas will not cover bottom completely).

Spread half of bean/meat mixture evenly over tortillas in dish. Sprinkle one third cheese on top. 

Repeat layering of tortillas, beans, meat, cheese, and sauce and top with remaining tortillas. Sprinkle remaining cheese over tortillas.
6 Bake: Bake casserole on the middle rack in the oven for 35 minutes, until the casserole is heated through and the cheese is completely melted and bubbling.

Let the casserole stand for 10-15 minutes before serving.
Serve with sour cream, chopped avocado, chopped cilantro, and thinly sliced iceberg lettuce on which has been sprinkled vinegar and salt.

Saturday, October 3, 2015

One Pot Chili Mac and Cheese


This one comes from Damn Delicious an it was so easy to throw together and everyone loved it!

Ingredients
  • 1 tablespoon olive oil
  • 2 cloves garlic, minced
  • 1 onion, diced
  • 8 ounces ground beef
  • 4 cups chicken broth
  • 1 (14.5-ounce) can diced tomatoes
  • 3/4 cup canned white kidney beans, drained and rinsed
  • 3/4 cup canned kidney beans, drained and rinsed
  • 2 teaspoons chili powder
  • 1 1/2 teaspoon cumin
  • Kosher salt and freshly ground black pepper, to taste
  • 10 ounces uncooked elbows pasta
  • 3/4 cup shredded cheddar cheese
  • 2 tablespoons chopped fresh parsley leaves
Instructions
  • Heat olive oil in a large skillet or Dutch oven over medium high heat. Add garlic, onion and ground beef, and cook until browned, about 3-5 minutes, making sure to crumble the beef as it cooks; drain excess fat.
  • Stir in chicken broth, tomatoes, beans, chili powder and cumin; season with salt and pepper, to taste. Bring to a simmer and stir in pasta. Bring to a boil; cover, reduce heat and simmer until pasta is cooked through, about 13-15 minutes.
  • Remove from heat. Top with cheese and cover until melted, about 2 minutes.
  • Serve immediately, garnished with parsley, if desired.

Saturday, October 25, 2014

Taco Casserole--Freezer Meal


This recipe comes from One Hundred Dollars a Month. Great for freezer meals! This recipe makes one 9x13 dish, so double/triple accordingly.

Ingredients
2 cups cooked rice
1 lb ground beef
1/2 cup chopped onion
1/4 cup chopped green or red bell pepper
1 can {15 oz} black beans, drained and rinsed
1 can {8 oz} tomato sauce
1 cup corn
1 teaspoon salt
1/4 teaspoon pepper
1 1/2 teaspoons chili powder
1/2 teaspoon garlic powder
1/4 teaspoon ground cumin
2 tablespoons fresh chopped cilantro
1 cup cheese, shredded {cheddar or Monterey jack work best, but use whatever you have on hand}

Preparation
Brown the beef with the onion until beef is cooked through. Add the bell peppers and cook for 2 more minutes. Stir in rice and all remaining ingredients except cheese together in a large roasting pan. Let mixture cool completely and then transfer to a gallon freezer bag. Place cheese in a small sandwich bag and then place in the gallon freezer bag with meat mixture. Freeze flat.

When ready to prepare, thaw in fridge overnight. Preheat oven to 350 F. Grease a 2 quart casserole dish and set aside.Pour mixture into prepared dish. Bake for 25 minutes. Remove from oven and top with cheese. Cook an additional 5 minutes or until cheese is melted. Enjoy.

Wednesday, July 16, 2014

Cafe Rio's Black Beans

Recipe from Fav Family Recipes!

Ingredients
  • 2 Tbsp. olive oil
  • 2 cloves garlic, minced
  • 1 tsp. ground cumin
  • 1 can black beans, rinsed and drained
  • 1 1/3 c. tomato juice
  • 1/2 tsp. salt
  • 2 Tbsp. fresh chopped cilantro
Instructions
  • In a nonstick skillet, cook garlic and cumin in olive oil over medium heat until you can smell it. Add beans, tomato juice, and salt. Continually stir until heated through. Just before serving stir in the cilantro.

Cafe Rio's Cilantro-Lime Rice

Recipe from Fav Family Recipes!

Ingredients
  • 1 c. uncooked rice (long-grain, white rice)
  • 1 tsp. butter or margarine
  • 2 cloves garlic, minced
  • 1 tsp. freshly squeezed lime juice
  • 1 can (15 oz) chicken broth
  • 1 cup water
  • 1 Tbsp. freshly squeezed lime juice
  • 2 tsp. sugar
  • 3 tablespoons fresh chopped cilantro
Instructions
  • In a saucepan combine rice, butter, garlic, 1 tsp. lime, chicken broth and water. Bring to a boil. Cover and cook on low 15-20 minutes, until rice is tender. Remove from heat. In a small bowl combine lime juice, sugar and cilantro. Pour over hot cooked rice and mix in as you fluff the rice.

Cafe Rio Cilantro Ranch Dressing

Okay so for Cafe Rio salads, your layers should include, from bottom to top: a tortilla, Romaine lettuce, your cooked meat of choice, black beans, tortilla strips/crushed tortilla chips, then cilantro ranch dressing. It's an awesome, filling meal! Here's their official dressing--tastes just the same! Recipe from Fav Family Recipes!

Ingredients
  • 1 packet TRADITIONAL Hidden Valley Ranch mix (not BUTTERMILK)
  • 1 c. mayonnaise
  • 1 c. buttermilk
  • 2 tomatillos, remove husk, diced
  • 1/2 bunch of fresh cilantro
  • 1 clove garlic
  • juice of 1 lime
  • 1 jalapeno (we like it SPICY so we kept the seeds in it, if you like it mild, just remove the seeds)
Instructions
  • Mix all ingredients together in the blender. That's it!

Cafe Rio Sweet Pork

For those of you familiar with Cafe Rio, they have amazing food...this pork was always my favorite type of meat to order. We moved to a state that doesn't have Cafe Rio, so I've had to recreate it! This tastes VERY similar to the real thing! Super easy--give it a try! This recipe comes from the amazing Oh Sweet Basil!

Ingredients
  • Pork Shoulder/Butt -3 to 4 pounds
  • 1 Old El Paso Sauce Packet (Roasted Garlic
  • 1 Cup Root Beer (A&W)
  • 2 Cups Light Brown Sugar
 Instructions
  1. Place the pork in a slow cooker. Mix the sauce, root beer and brown sugar in a bowl and pour all over the pork. Cook on low for 6 hours, remove the meat and shred (it should be quite easy and tender). Place the meat back in the sauce and cook on low for an additional 2 hours.
  2. Serve immediately.

Tuesday, July 8, 2014

Chicken Chimichangas

Freezer meal brought to our last exchange--they were so yummy!!

Ingredients:

  • 2.67 cups boneless chicken breasts, cooked and shredded
  • 8 ounces light cream cheese, softened
  • 8 ounces light Mexican style shredded cheese
  • 2 Tablespoons taco seasoning
  • 0.375 cups green onions, chopped
  • 8 whole flour tortillas

Directions:

In a large bowl, mix together chicken, cream cheese, shredded cheese, taco seasoning, and green onions. Evenly place mixture in flour tortillas, right in the middle. Fold in each end, then roll to close. Place seam down in baking dish. Bake at 350 for 15 minutes, flip over and bake another 15 minutes.

Freezing Directions:

Prepare as directed above, but do not bake. Cover baking dish, cover, label and freeze. TO SERVE: Thaw. Bake at 350 for 15 minutes, turn, and bake another 15 minutes.

Thursday, July 3, 2014

Homemade Salsa {For Canning}

This recipe was super easy and I was able to knock out 6 quarts in about an hour! (I doubled the recipe). Definitely going to use this as my go-to for salsa from now on! Recipe from Simply Recipes, with just a few tweaks. :)

Ingredients

  • 5 lbs of tomatoes
  • 1 lb large Anaheim green chiles (5-6 chiles)
  • 3 jalapeno chilies, seeded and stems removed, chopped (I left the seeds because I wanted it spicy)
  • 1-1/2 cups chopped onion
  • 3 cloves garlic, minced
  • 1 cup apple cider vinegar
  • 1/2 cup loosely packed fresh chopped cilantro (including stems)
  • 2 teaspoons dried oregano
  • 1/2 teaspoon ground cumin
  • 2 teaspoons salt
  • 1-2 teaspoons sugar or more (to taste)
Canning equipment needed:
  • Canning jars, with rings and new lids
  • A very large stockpot or canning pot (16-qt)
  • A flat steamer rack on which to place the filled jar for the water bath canning, so that they don't touch the bottom of the pan and crack from excess heat
Canning equipment recommended:
  • Canning tongs to make it easy to lift the jars in and out of boiling water
  • Rubber or latex coated gardening gloves to make it easier on your hands for handling hot jars

Method

1 Prepare for canning. Put jars in dishwasher on "sterilize" to heat, start boiling water in canner, heat jar lids in a separate pot.
2 Chop up peppers and cilantro and add all ingredients into a bowl. I used the easy way for this and just pulsed everything in my food processor a few times.
3 Prepare the tomatoes. To blanch them, score the ends of the tomatoes and place them in boiling water for a minute. Remove and discard the peels. Cut away any cores if you haven't done so already. Chop the tomatoes taking care to save any juices that may come out of them. Starting with 5 pounds of tomatoes you should end up with about 8 cups of chopped tomatoes and juices. (You must use at least 7 cups of tomatoes.) Place them in a bowl and set aside.
4 Put all of the ingredients into a large (8-qt) stainless steel pot. (Do not use aluminum or the acidity of the sauce will cause the aluminum to leach into the sauce.) Bring to a boil, reduce to a simmer. Cook uncovered for about 10 minutes.
5 While the salsa is cooking, place the jar lids in a bowl and cover with hot (not boiling) water to sterilize.
6 If you want your salsa to be more smooth than chunky, use an immersion blender to pulse it a few times, or working in batches ladle about half of it into a blender and purée.
7 Adjust seasonings. If too acidic to taste, you can balance it with a little more sugar. If too sweet, add a bit more vinegar.
8 Ladle salsa into canning jars, leaving 1/2-inch head space. Wipe the rims with a clean, dampened paper towel so that there is no residual food on the rims. Place canning lids on the jars. Screw on the lid rings. Do not over-tighten or you may not get a good seal. Air does need to escape from the jars during the next step, the water bath.
9 Place the filled and lidded jars back onto the rack in the large stock-pot of hot water you used to sterilize the jars in step one. You may need to remove some of the water from the pot to prevent it from overfilling. Cover the jars with at least 1-inch of water. Bring to a rolling boil and process for 15 minutes (20 minutes for altitudes 1000 to 6000 ft, 25 minutes above 6000 ft). Then turn off heat and let the jars sit in the hot water for 5 minutes. Remove jars from the water bath and let sit on a counter for several hours until completely cool. The lids should "pop" as the cooling salsa creates a vacuum under the lid and the jars are sealed. If a lid has not sealed, either replace the lid and reprocess in a water bath for another 15 minutes, or store in the refrigerator and use within the next few days.
Remember to label the cans with the date processed. (I use a Sharpie on the lid.) Canned salsa should be eaten within a year.